Add as a preferred source on Google
The Model Context Protocol (MCP) is an open standard that establishes secure connections between AI-driven tools and non-public data sources.
In other words, MCP creates a secure bridge between AI assistants and your data sources, enabling AI models to perform operations directly on your systems. This frees developers from the hurdles of building a custom integration from scratch for every single API or database.
MCP gives tools like Claude and ChatGPT a direct line to your data. Instead of just guessing, the AI can tap into your file systems, internal documentation, or databases to grab real-time info and handle operations across your favorite apps.
For online businesses, this opens up unprecedented opportunities because it allows you to connect your WordPress site to an MCP Client like Claude Desktop, enabling them to communicate and leverage the agentic capabilities of AI through the Abilities registered on your WordPress site.
If this sounds too complex, don’t worry. In this tutorial, we will provide step-by-step instructions for configuring your WordPress site and the Claude MCP client, and for performing operations on your site through Claude Desktop.
But before we begin with the how-tos, let’s define the core concepts of the Model Context Protocol.
MCP core concepts and definitions
If you have decided to open your WordPress site to interaction with an AI model via the Model Context Protocol, it is important to clearly understand the chain of components involved.
MCP Client: It is a software component that enables an AI host to connect to an MCP server. The AI host is the application the user interacts with (such as Claude Desktop), while the client is the protocol-level component that enables the actual connection to the server.
MCP Server: This is a software application (or process) that exposes specific capabilities to an AI application through a standardized protocol. Examples include file system servers, database servers, calendar servers, and more.
MCP Adapter: This is the bidirectional translation bridge between the MCP Client and the core of your WordPress site. Its purpose is to adapt your WordPress site’s Abilities to the Model Context Protocol primitives, enabling AI agents to discover and execute your site’s features as MCP Tools and read its data as MCP Resources.
Abilities API: This is the architectural layer that enables all WordPress components—both core and plugins—to expose their functionality in a unified, understandable way for both humans and machines. It enables developers to register standardized, self-describing actions with strict input/output schemas that the AI can discover and execute autonomously.

What you can do with WordPress and MCP
By connecting an AI agent to your WordPress site, you can leverage the full power of AI to read data or execute complex operations directly from your AI host application.
Through your AI host, you can manage content, handle administration and maintenance tasks, monitor site health, manage users, update product catalogs, analyze orders, and much more. This is not just about executing isolated actions; it is about governing your site’s infrastructure without ever opening the WordPress admin dashboard.
You could ask the AI to draft a post based on your general guidelines, specifying the length, tone, and depth of analysis. You could also instruct it to generate images, perform live calculations, and support the content with summary tables displaying percentages and absolute values.
Consider also the efficiency of automating operations: managing onboarding for new users by automatically assigning roles based on their responsibilities within your organization, analyzing sales performance by product over the last quarter, or automatically generating summary reports for your team.
But you can aim even higher. Thanks to the Abilities API, WordPress has become an agentic hub that integrates seamlessly into automated workflows managed by AI. The AI agent can monitor external contexts—such as market trends, price fluctuations, or weather conditions—query the database to check inventory levels or purchase history, and make autonomous, data-driven decisions.
The site owner will only need to provide instructions in natural language to the AI agent, which will then orchestrate the entire operational workflow.
How to connect an AI Agent to your WordPress site via MCP
Before we get our hands dirty with code and configurations, let’s go over the system requirements. To connect your WordPress site to an AI client via MCP, you will need the following:
- A development WordPress site: The minimum required version is 6.9, but 7.0+ is highly recommended.
- Node.js installed on your local computer.
- Claude Desktop: Anthropic’s official MCP host application.
- Your favorite code editor: We are using VS Code for this tutorial.
- An API client like Postman for testing.
Configure WordPress
Since we’ll be working with the WordPress Abilities API, you will need a staging or development environment with WordPress 6.9 or higher. If you are working locally, make sure URL rewriting is enabled.
Step 1: Install the WordPress MCP Adapter Plugin
First, grab the MCP adapter’s plugin .zip file from GitHub and install it on your WordPress website. When you activate it, the plugin automatically registers a default MCP server that is accessible at the following address:
https://yoursite.com/wp-json/mcp/mcp-adapter-default-serverThe server expects authenticated requests. If you send this request without authentication, you will receive the following response object:
{"code":"rest_forbidden","message":"Sorry, you are not allowed to do that.","data":{"status":401}}We’ll jump back to this in a second.
Now you need to verify that the mcp namespace is registered correctly. To do this, send the following request in your browser or in Postman:
https://yoursite.com/wp-json/In the response, look for the mcp namespace:
{
	"name": "WordPress 7.0",
	"description": "",
	"url": "http://yoursite.com",
	"home": "https://yoursite.com",
	"gmt_offset": "0",
	"timezone_string": "",
	"page_for_posts": 0,
	"page_on_front": 345,
	"show_on_front": "page",
	"namespaces": [
		"oembed/1.0",
		"mcp",
		"wp/v2",
		"wp-site-health/v1",
		"wp-block-editor/v1",
		"wp-abilities/v1"
	],
	...
}
If you see it, it means the MCP server is working as expected. Otherwise, check that the plugin is active or that you are using the correct version of WordPress.
Now that you’ve turned your WordPress site into an MCP server, let’s move on to registering the Ability you need to allow the Claude Desktop MCP Client to communicate with your site and perform actions. In our example, you will be creating a post draft.
Step 2: Register your abilities with a plugin
Open your favorite code editor, create a new file, and write the following code:
<?php
/**
 * Plugin Name: My MCP Test Plugin
 * Description: Demonstration plugin for creating posts via MCP.
 * Version: 1.0.0
 */

if ( ! defined( 'ABSPATH' ) ) {
	exit;
}

add_action( 'wp_abilities_api_init', 'kinsta_mcp_register_simple_draft_ability' );

/**
 * Registers a minimal ability to create post drafts.
 * This acts as a formal contract between the underlying PHP logic and the AI client.
 *
 * @return void
 */
function kinsta_mcp_register_simple_draft_ability(): void {

	if ( ! function_exists( 'wp_register_ability' ) ) {
		return;
	}

	wp_register_ability(
		'kinsta-plugin/create-draft',
		array(
			'category'	=> 'post',
			'label'	   => __( 'Create Post Draft', 'kinsta-mcp-draft' ),
			'description' => __( 'Creates a new post draft with a title and content provided by the AI agent.', 'kinsta-mcp-draft' ),
			'input_schema'  => array(
				'type'	   => 'object',
				'properties' => array(
					'title'   => array(
						'type'		=> 'string',
						'description' => __( 'The headline or title of the post draft.', 'kinsta-mcp-draft' ),
					),
					'content' => array(
						'type'		=> 'string',
						'description' => __( 'The body text or content generated for the draft.', 'kinsta-mcp-draft' ),
					),
				),
				'required'   => array( 'title', 'content' ), // Mandatory fields for the AI payload
			),
			'permission_callback' => function(): bool {
				return current_user_can( 'edit_posts' );
			},
			'execute_callback'	=> function( array $args ): array {
				$post_id = wp_insert_post( array(
					'post_title'   => sanitize_text_field( $args['title'] ),
					'post_content' => wp_kses_post( $args['content'] ),
					'post_status'  => 'draft',
					'post_type'	=> 'post',
				) );

				if ( is_wp_error( $post_id ) ) {
					return array(
						'success' => false,
						'error'   => $post_id->get_error_message()
					);
				}

				return array(
					'success' => true,
					'message' => __( 'Draft saved successfully!', 'kinsta-mcp-draft' ),
					'post_id' => $post_id
				);
			},

			// Explicitly flag this ability as public to expose it through the default MCP Server
			'meta' => array(
				'mcp' => array(
					'public' => true,
				),
				// Also expose within the native WordPress REST API
				'show_in_rest' => true,
			),
		)
	);
}
Here are the key takeaways of this plugin:
- To register your ability, you will hook the
wp_register_ability()function into thewp_abilities_api_initaction. - The first function’s argument specifies the ability name, including the namespace (
kinsta-plugin/create-draft). - The second argument sets the ability’s configuration parameters.
input_schemais an array that defines the input contract for the ability. In this case, the ability expects to receive an object with two required text strings:titleandcontent.permission_callbackis a function that verifies whether the agent has the required permissions to run the ability (edit_posts).execute_callbackis the callback function executed when the ability is triggered. In this example,wp_insert_postis used to create a new post draft.- The
meta.mcp.publicflag makes the ability available via the MCP Adapter default server (read more about this here).
We won’t dive deeper into the Abilities API. If you want/need to know more, check out our in-depth tutorial Getting started with the WordPress Abilities API.
Now save the file, zip it, and upload it to your site as a plugin. Once activated, you are ready to move on to the next steps.
Step 3: Generate an Application Password
All requests sent to the WordPress MCP server must be authenticated using an Application Password. To generate an Application Password, open your WordPress dashboard, navigate to Users > Profile, and scroll down to the Application Passwords section. Enter a name for your password and click on Add New Application Password.
This will generate a password for you to use in your application. Make sure to copy and paste the password into a safe place, because this is the only time you will be able to see it. If you lose it, you will have to create a new one.
WordPress requires an HTTPS connection to generate an Application Password. If you don’t see this section in your user profile, verify that your site is being served over HTTPS. For more information, check the official documentation.
Test the entire chain in Postman
Before configuring Claude Desktop, you may want to test the entire chain in Postman, as it makes troubleshooting much easier and faster.
Step 1: Test the initial handshake
First, test the initial handshake by sending the following POST request:
https://yoursite.com/wp-json/mcp/mcp-adapter-default-serverThe request must be authenticated. When you create a new HTTP request in Postman, select Authorization > Basic Auth and enter your WordPress username and Application Password.
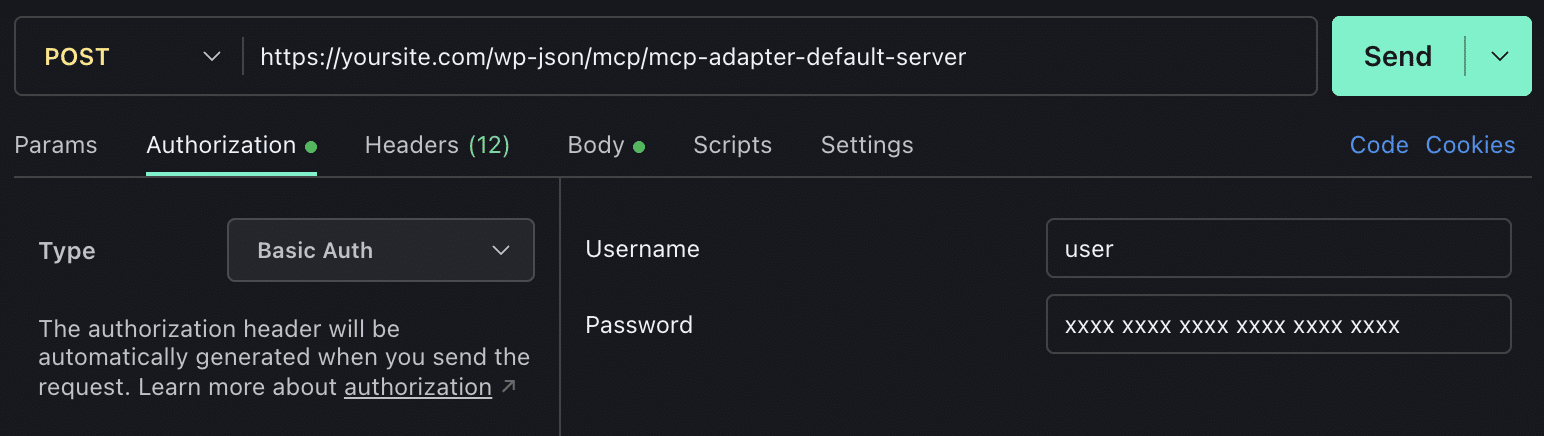
Next, add the following headers:
Content-Type: application/json
Accept: application/json, text/event-stream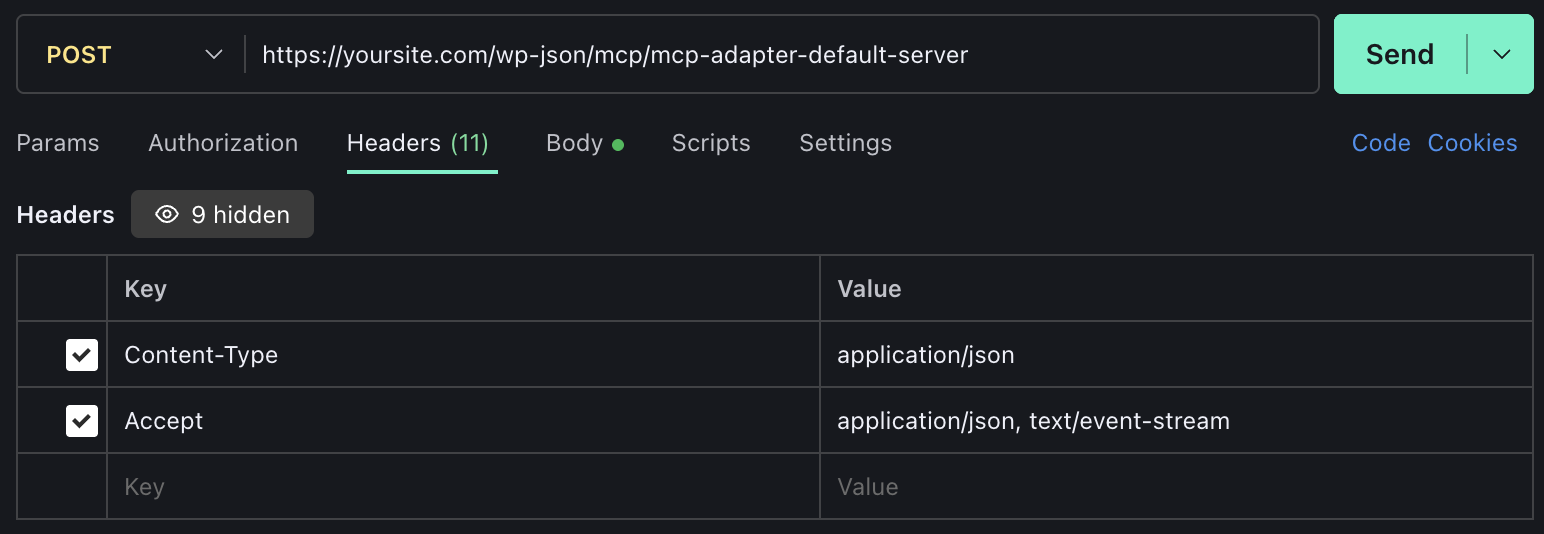
Switch to the Body tab, select raw > JSON, and set the following body:
{"jsonrpc":"2.0","id":1,"method":"initialize","params":{"protocolVersion":"2025-03-26","capabilities":{},"clientInfo":{"name":"postman","version":"1.0"}}}
Now you can click the Send button. If the MCP server is working properly, you will see a 200 OK status code and the JSON response shown in the image below:

The response should include the mcp-session-id header. Copy this value because you will need it for the next test.

Step 2: Verify that the ability is visible
Now you need to verify that your ability is visible. You will use the same URL and the same Basic Auth. Just add the mcp-session-id header to the ones you’ve already entered, and use the following JSON object in the request body:
{"jsonrpc":"2.0","id":2,"method":"tools/call","params":{"name":"mcp-adapter-discover-abilities","arguments":{}}}The following image shows the MCP server response body:
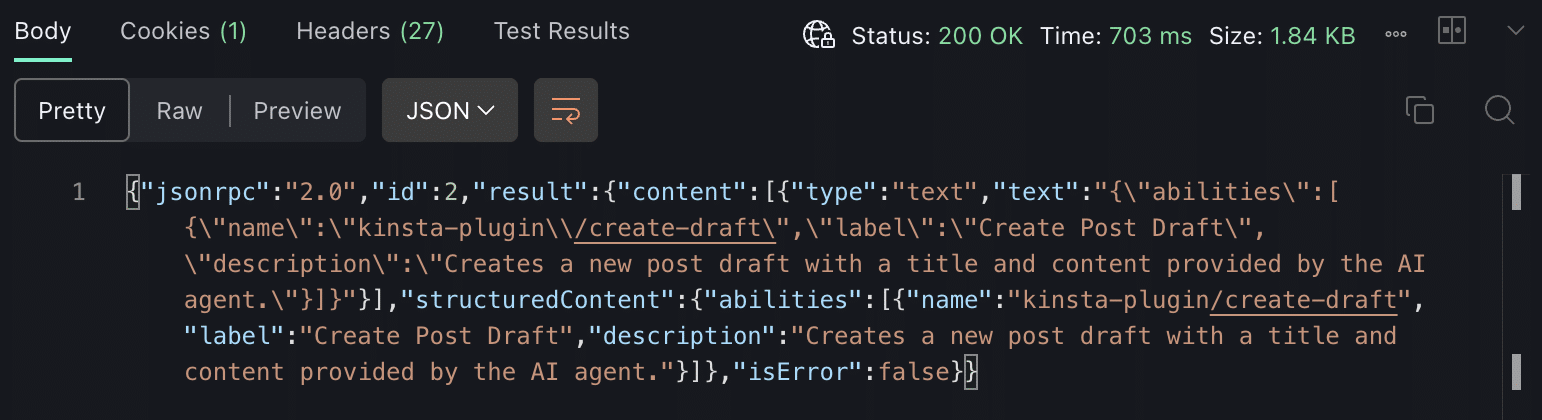
The JSON response object should include the name of your ability (in our example, kinsta-plugin/create-draft).
Step 3: Run the ability from Postman
Finally, let’s try running our ability from Postman. The URL, Basic Auth, and headers remain the same. Only the request body changes, which should be set as follows:
{"jsonrpc":"2.0","id":3,"method":"tools/call","params":{"name":"mcp-adapter-execute-ability","arguments":{"ability_name":"kinsta-plugin/create-draft","parameters":{"title":"Postman test","content":"Test content from Postman"}}}}methodtells the MCP server to use one of the default server tools (tools/call).params.nameis the generic tool (mcp-adapter-execute-ability) responsible for executing the ability specified below.params.arguments.ability_nameis the full identifier of the ability to execute (kinsta-plugin/create-draft).params.arguments.parametersis the object containing the arguments required by the ability’s input_schema (titleandcontent).
Now, click Send to transmit the request. You should receive a 200 OK status and the following response:

Next, open your WordPress admin dashboard and verify that the Postman test draft exists.
If you’ve made it this far without any issues or errors, you can move on to the final stage: configuring Claude Desktop.
Configure Claude Desktop
Now you need to connect Claude Desktop to your WordPress site using the official @automattic/mcp-wordpress-remote proxy. This translates MCP calls via STDIO into authenticated HTTP requests to the WordPress REST API.
Step 1: Edit the configuration file
Open the Claude Desktop configuration file directly from the application by clicking the icon with your name in the bottom-left corner, and then navigating to Settings > Developer > Edit Config.

This will take you directly to the claude_desktop_config.json file. Open the file and replace its current content with the following:
{
  "mcpServers": {
	"wordpress-kinsta": {
	  "command": "npx",
	  "args": ["-y", "@automattic/mcp-wordpress-remote@latest"],
	  "env": {
		"WP_API_URL": "https://yoursite.com/wp-json/mcp/mcp-adapter-default-server",
		"WP_API_USERNAME": "your-wp-username",
		"WP_API_PASSWORD": "xxxx xxxx xxxx xxxx xxxx xxxx",
		"OAUTH_ENABLED": "false"
	  }
	}
  }
}
Make sure to replace the placeholders with your actual data, then save the file and close Claude Desktop completely from the system tray—not just by closing the window, as it might keep running in the background.
Step 2: Verify the connection in Claude Desktop
Go back to Claude Desktop and navigate to Your name > Settings > Developer. Here, you will now find the list of local MCP servers. If you have followed all the previous steps, you should see a summary tab for the wordpress-kinsta server with a running status.
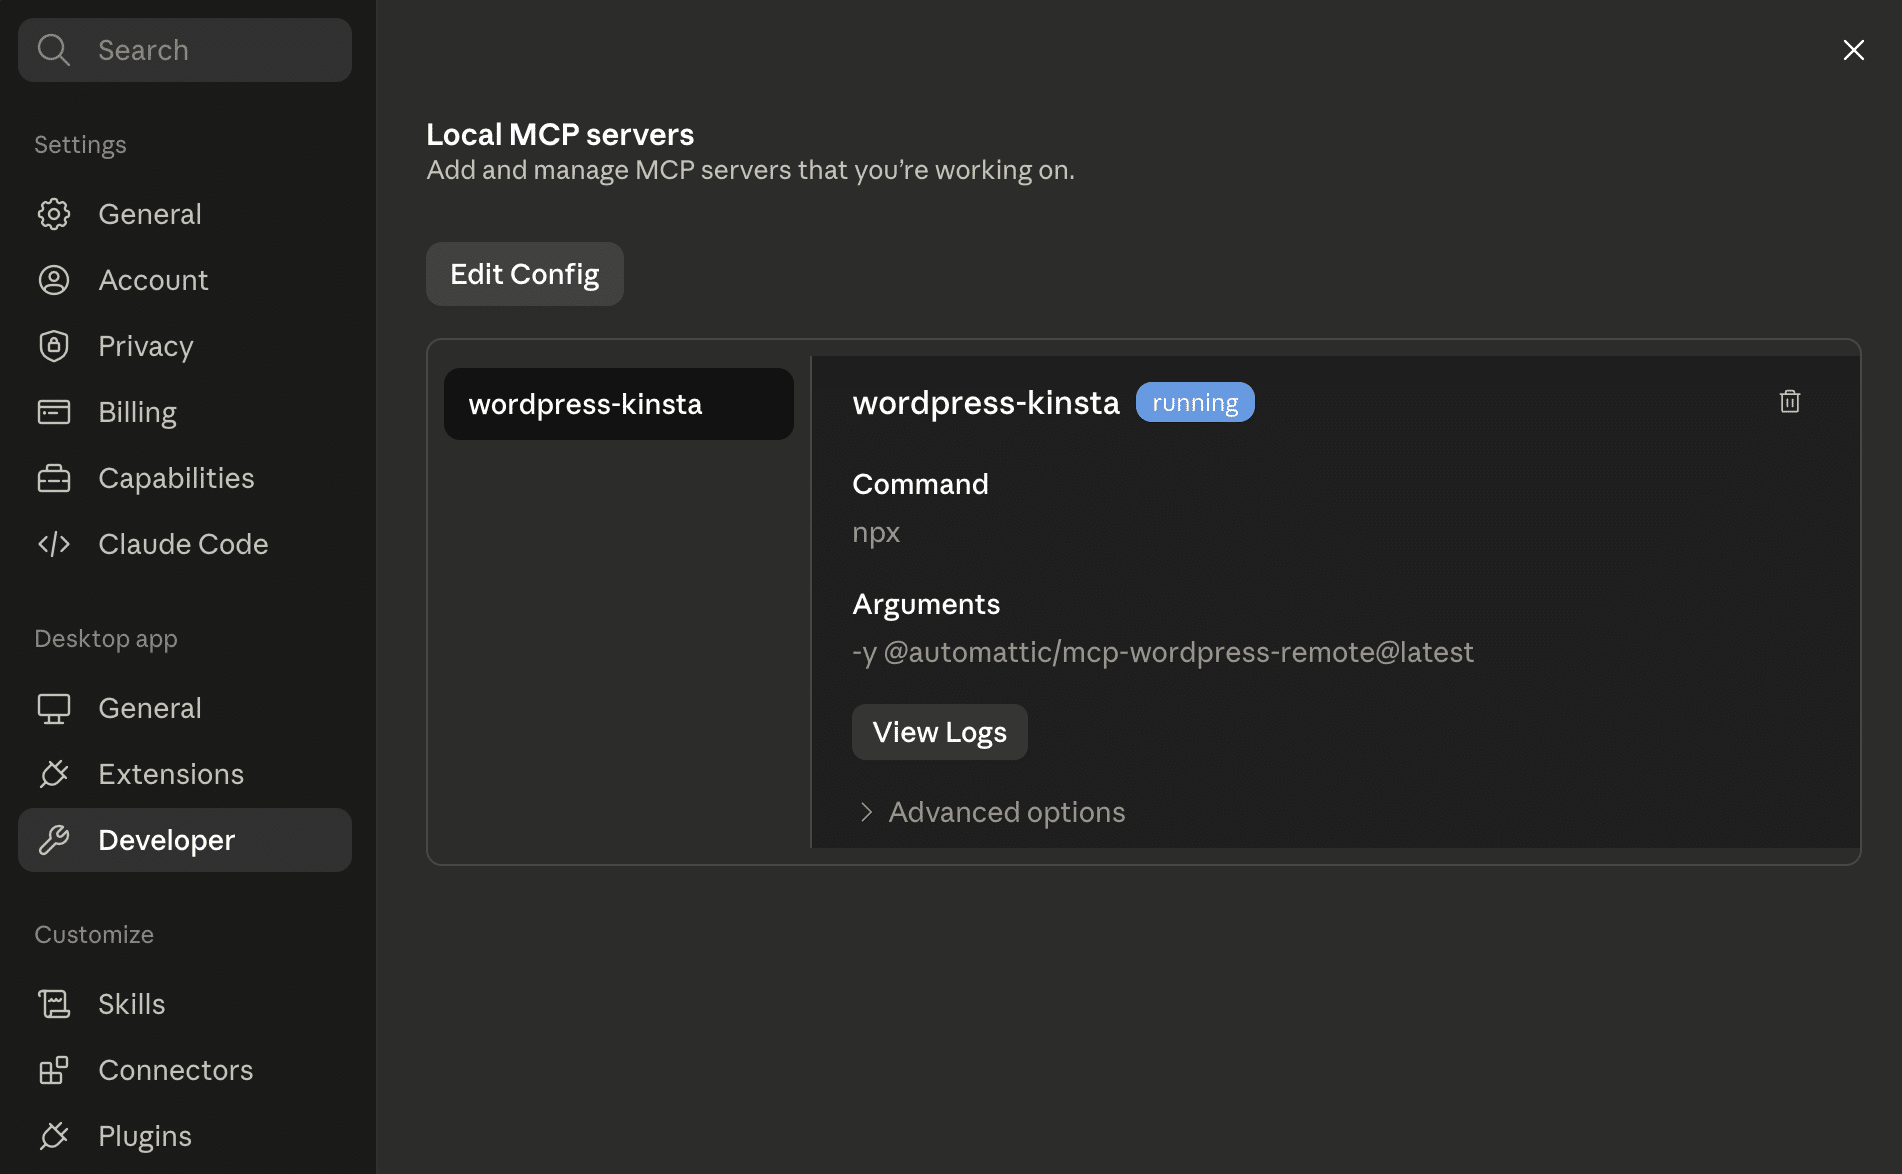
Now ask Claude to list the available tools from the wordpress-kinsta server. Claude Desktop will respond by listing the tools as shown in the image below:

As mentioned earlier, you don’t need to know the identifiers for every ability. Just explain to the AI what you want it to do, and the model will discover the registered abilities, find the right one along with its parameters, and finally execute it with the correct values.
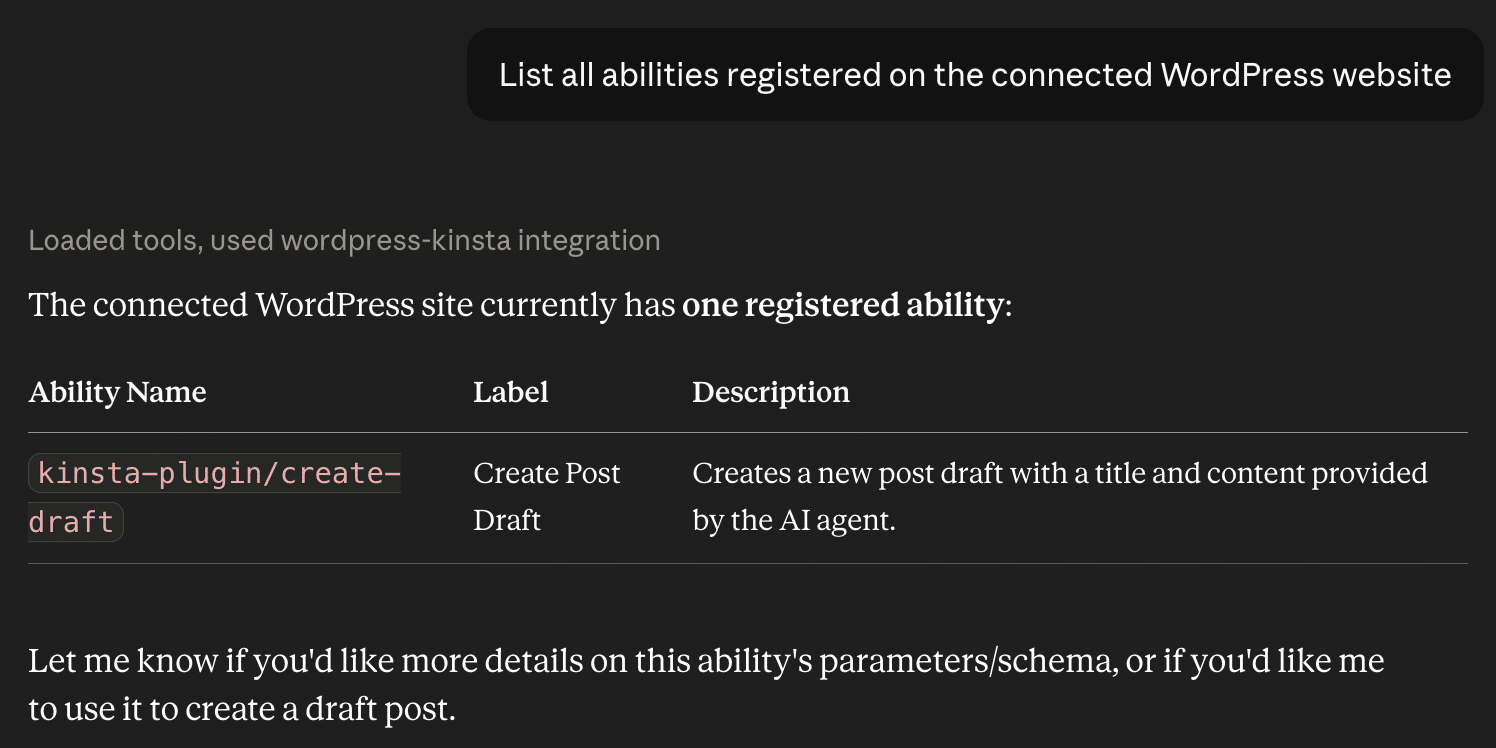
To provide more details about a specific ability, you will be asked to authorize Claude to use Get Ability Info from the wordpress-kinsta MCP server. Once you approve the request, Claude will provide you with all the details of the ability.

Ask the AI to execute your ability
Finally, you can send Claude your first request to create a draft post. Of course, you will ask Claude to generate the text using a prompt that provides specific guidelines. The image below provides an example:
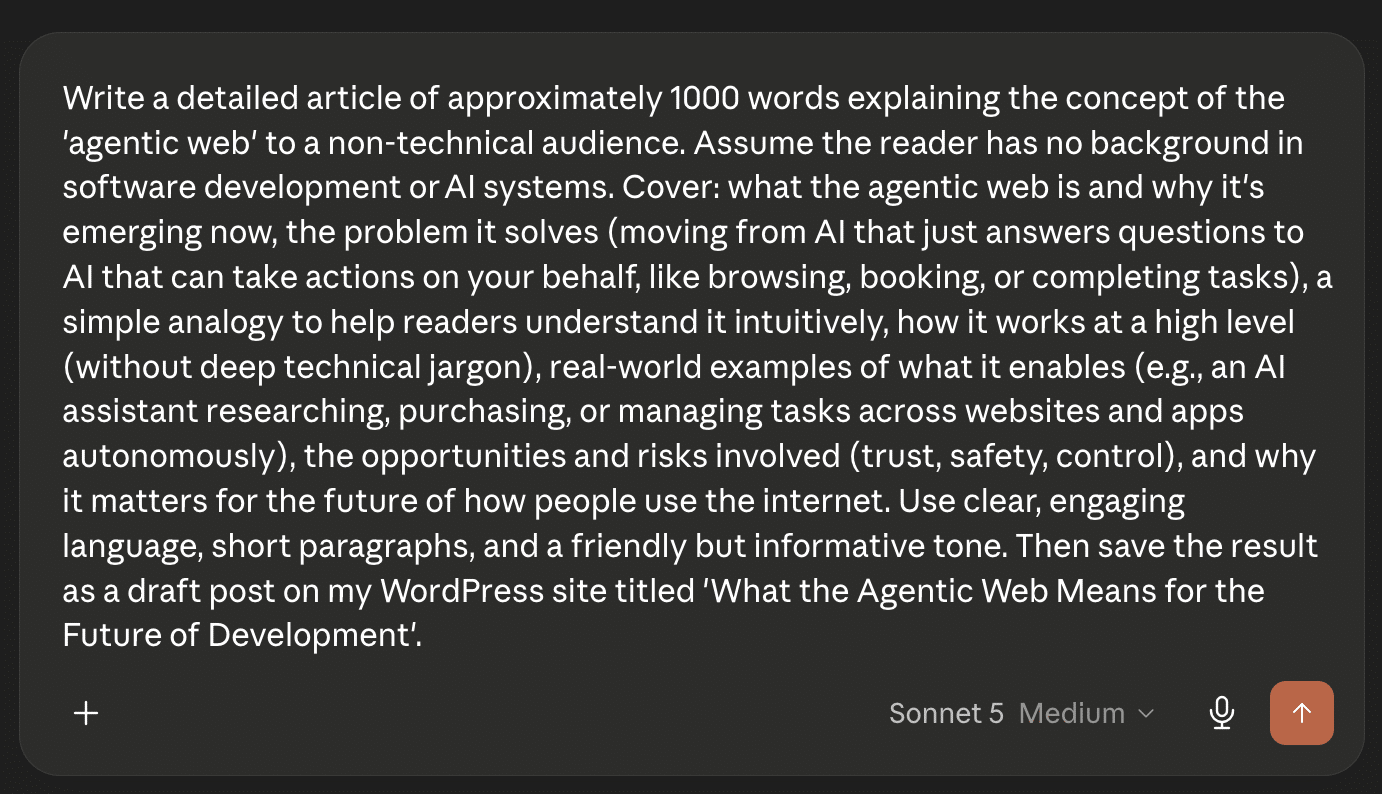
Authorize Claude to execute the ability and wait a few seconds for the result. What you will see in the chat once the operation is complete will look similar to the image below:

Now hop into your WordPress admin dashboard and go to the Posts screen. Here, you should find your draft with the title you chose. Open it up and take a look at the editor:

And yes, the result is truly amazing, considering it only took a few seconds to generate.
It should be noted, however, that the content produced is in pure HTML. This is because our plugin doesn’t include the logic to map content sections into Gutenberg blocks.
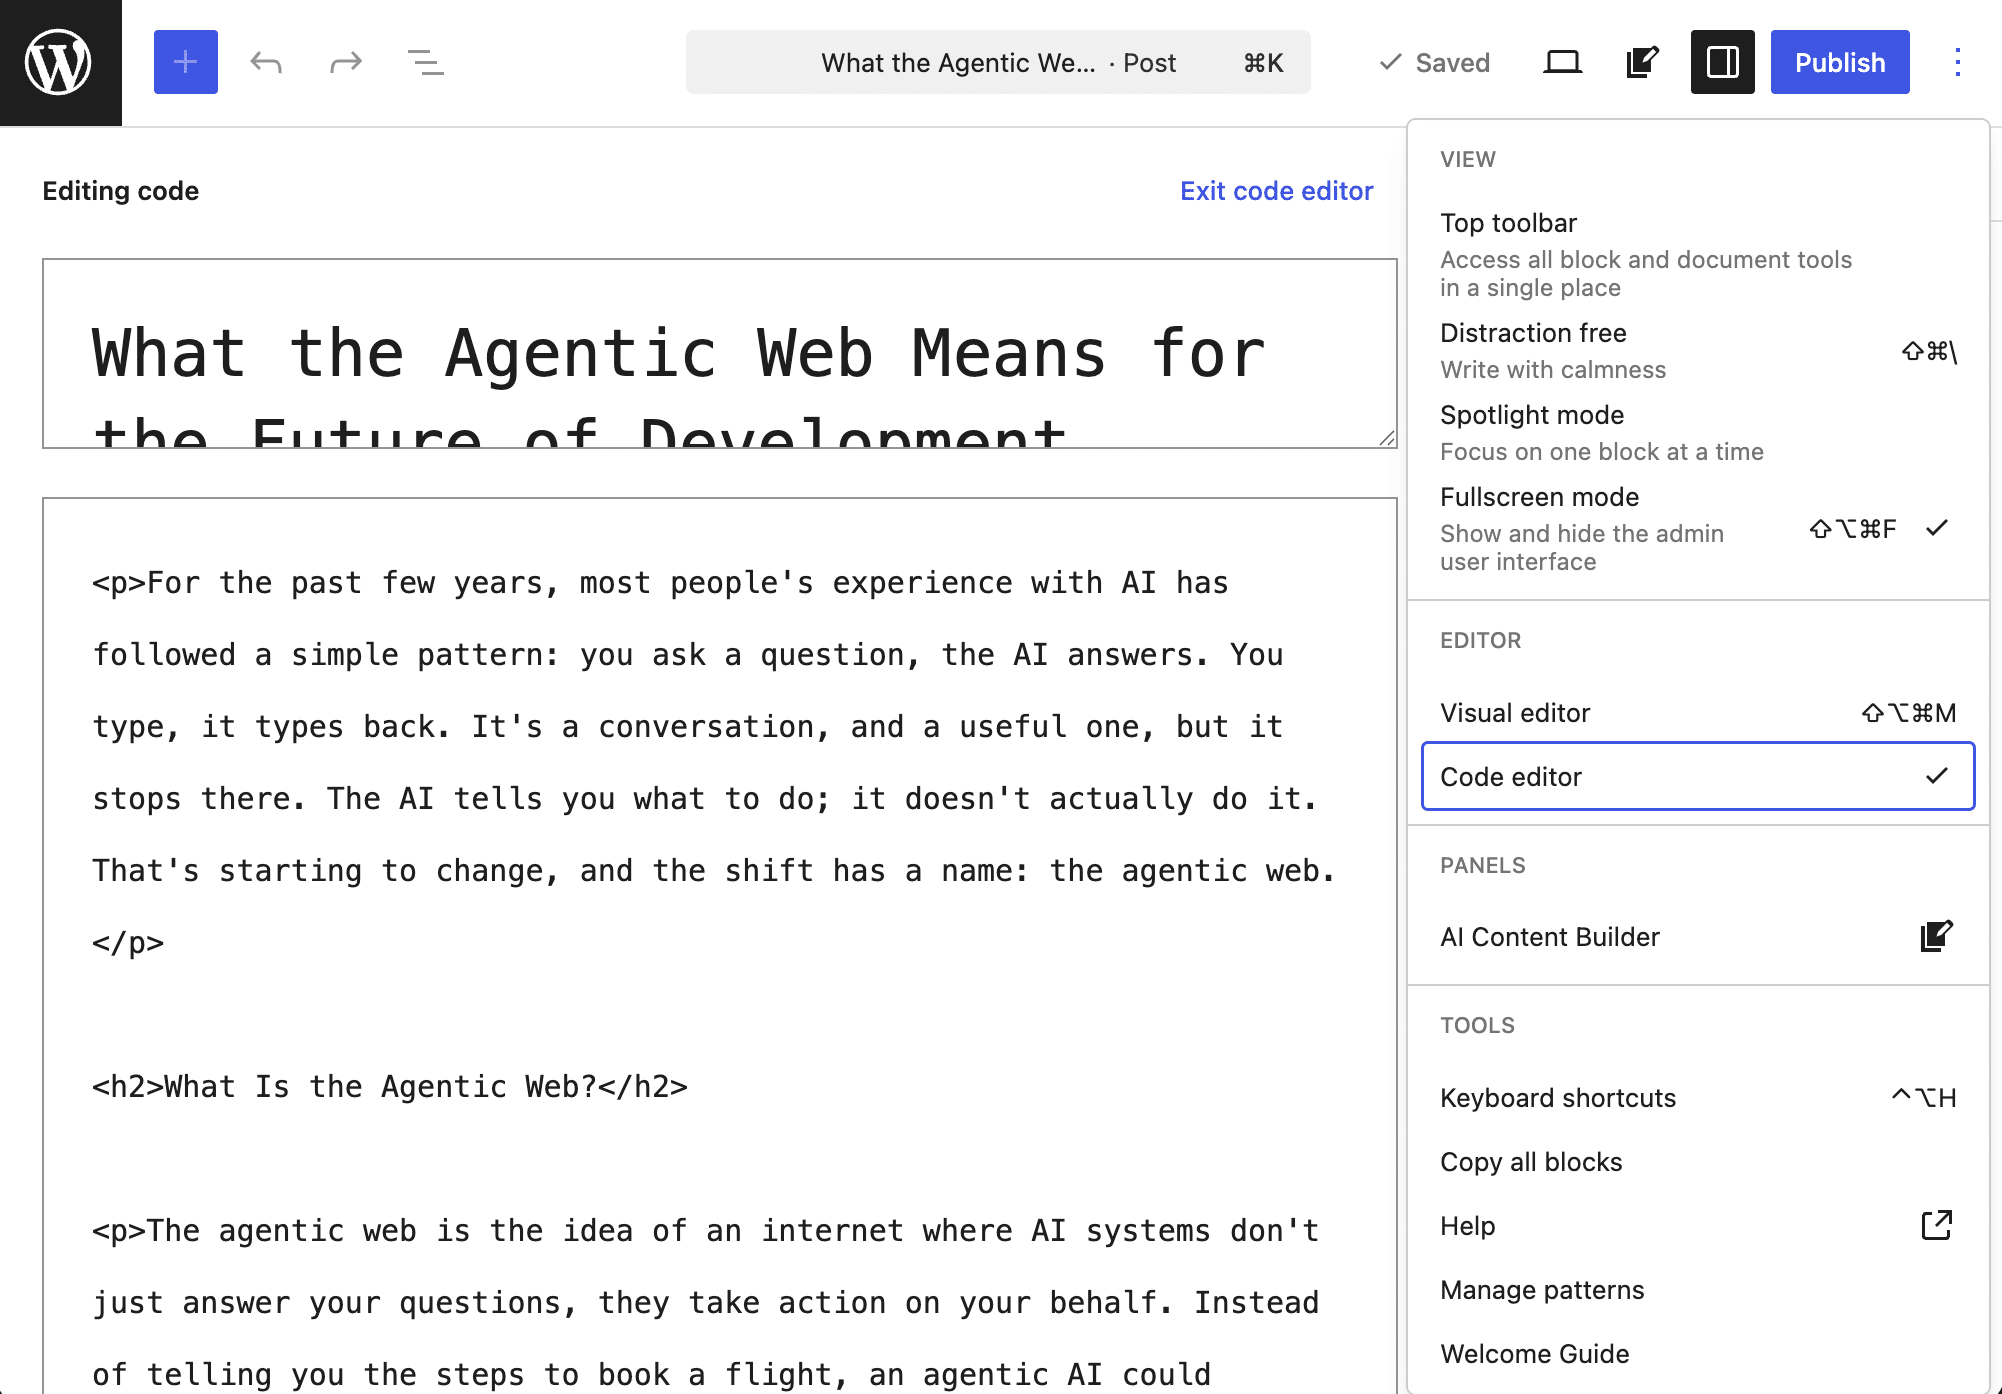
We then repeated the request, this time asking Claude to format the content into Gutenberg blocks. Here is the response we got in the chat:

And here is the post draft in the WordPress Code Editor:

Why your agentic WordPress site needs a high-performing infrastructure
Connecting your WordPress site to an AI model through the Model Context Protocol drastically changes the nature of your website. It is no longer just about serving static pages from a cache or responding to individual user requests. To communicate with your AI Client via MCP, WordPress must be able to handle a completely different type of request load.
Consider that an AI agent can execute dozens of REST calls in a matter of seconds—a sequence that no human user could ever perform in such close succession. Furthermore, MCP requests completely bypass page caching and hit your PHP threads directly with every single handshake. This pattern requires a PHP/database stack optimized for performance; otherwise, you risk timeouts in the middle of a critical operation (such as programmatically creating a post draft).
When it comes to public abilities, security is another key focus because every ability exposed via MCP is an endpoint that needs to be locked down. While the API allows you to define a permission_callback and requires requests to be authenticated via an Application Password, a hosting provider that delivers stringent security measures—such as Web Application Firewalls, container isolation, automated SSL certificates, and IP blocking—drastically reduces the attack surface and mitigates the risks of unauthorized intrusions to your site.
Having staging environments that run over HTTPS using the exact same technology stack as your live site is an absolute must when testing the abilities registered on your site before deploying them to production. In addition, access to developer tools like SSH and WP-CLI is indispensable for building a reliable AI integration on top of the MCP protocol.
Observability is also a strategic requirement for a website that constantly dialogues with AI tools. Accessing an APM tool and your server logs is vital to understanding what is happening behind the scenes, diagnosing why an HTTP request might be failing silently, and identifying what is causing bottlenecks within your site architecture.
For all these reasons, it is more crucial than ever today to choose an infrastructure and hosting service that provides the architecture, tools, and premium support that a modern WordPress site demands. Kinsta offers all of this and more under a single, centralized dashboard.
From there, you can access your site directly, initiate performance monitoring, fetch SSH login details, download site logs, and get in touch with our specialized support team. If your AI automations require even more raw computing power, you can instantly optimize PHP performance or add the premium staging environment add-on to ensure maximum responsiveness in both testing and production.
The future of WordPress is agentic
WordPress is evolving from a traditional CMS into a full-fledged agentic application hub. The introduction of the Abilities API and the AI Client is definitive proof that the future of the web is no longer built solely on human interactions but heavily includes machines and intelligent agents working autonomously in the background.
Whether it is converting an audio file into a post, integrating an automated workflow via GitHub Actions, or building a seamless bridge between your site and the Claude Desktop client, WordPress is fully ready to process complex requests and translate input data into native Gutenberg blocks. It is up to you to give your applications the power, security, and scalability they need by choosing an industry-leading hosting partner like Kinsta.
Have you taken a look at our plans yet? If you are unsure which one best fits your site’s specific workflow, our sales team will be more than happy to answer all your questions.

Carlo is a passionate lover of webdesign and front-end development. He has been playing with WordPress for more than 20 years, also in collaboration with Italian and European universities and educational institutions. He has written hundreds of articles and guides about WordPress, published both on Italian and international websites, as well as on printed magazines. You can find him on LinkedIn.